
Bunker Hill Blue & Rust Dresser tutorial
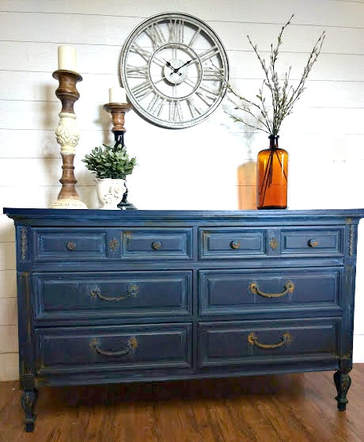
If patina and rusty, crusty goodness brings you joy, then this is the tutorial for you! This little dresser started out in an unfortunate yellow-gray color that just made me feel sad. The lines and details were great however, and that made this piece a great candidate for adding strong color and using a rust finish on the details to bring them to life. I also added a simple color wash in the nooks and crannies and allowed it to drip down the piece for added patina effect. Does this sound too complex? It's actually quite simple and a very fun technique that you can use for anything that you want to give that aged look.
Here are the supplies I used to create this look:
Dixie Belle chalk paint in Bunker Hill Blue
Any brand of acrylic paint in lighter shades of blue that you like (those little craft paint bottles are the cheapest)
Modern Masters Reactive Metallic Iron Paint
Modern Masters Rust Activator
Rustoleum Soft Touch Polyurethane in Matte finish
Detailer's Choice Applicator Sponge (awesome for a stroke-free poly finish)
Water misting bottle
Folk Art 1" Smooth Basecoating Brush (YES! The brush you use really does matter)
Folk Art 2" Smooth Basecoating Brush (great for painting larger areas like the top and sides)
Small round point artist's brush (like you would use to paint a picture)
Links to these items are located on my blog page here.
Here are the steps I followed to achieve this finish:
1. Use wood filler to fill any dings or dents and when dry, sand it smooth. Clean your piece with a 50/50 mix of denatured alcohol and water.
2. Using your 1" Folk Art paint brush, paint 2 coats of Dixie Belle Bunker Hill Blue chalk paint over the entire piece, including the hardware. For the top and sides, I use the 2' brush since it covers more area. Allow it to dry between coats.
3. Take the lighter blue shade of acrylic paint that you have chosen and thin it with water until it is slightly runny, like warm syrup.
4. Dip a round point artist's brush into this paint and start painting around the tops of the detailed areas and the inside edges of the drawer fronts. Keep adding the paint until it begins to run down and pool near the bottom. Don't panic here.....this is the ugly stage you have to push through!
5. If your paint isn't "moving" enough, then take your spray mister and mist away until it begins to drip. You can always go back and add more paint if the effect you're getting isn't strong enough to suit you.
6. Next, lightly mist the top of your piece with water and then take your 2" brush and dip just the tips of the bristles into the thinned paint and, using long side to side strokes, dry brush the lighter blue across the top of the piece and also going down the sides, using long up and down strokes. If your brush begins to drag, then use your water mister lightly to allow your brush to slide easily across the surface. Again, you can add more paint if you want a stronger effect. Just allow the first coat to dry fully so you can see how strong the effect is. Don't forget to highlight your hardware also! Remember, this is art, so don't worry about perfection. A little imperfection is what makes this finish unique and interesting!
7. Once you've reached the level of drips and highlights you prefer, allow everything to dry completely.
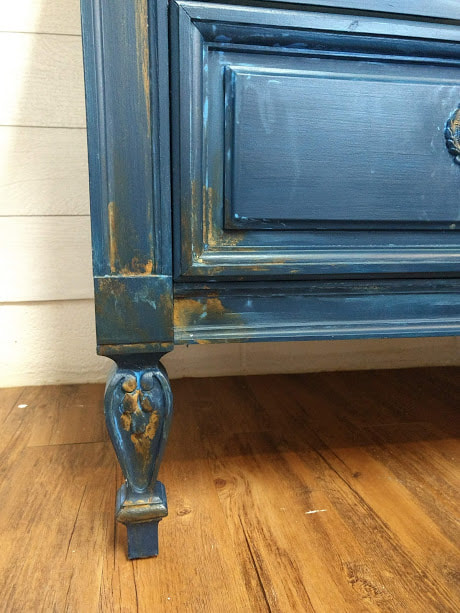
8. Now for the magic!!! Thoroughly stir your Modern Masters Metallic Iron Paint. It's very thick so use a stir stick and mix it well. Then using your round artist's brush, start adding the paint onto the areas where you want so see rust. Use a light touch here because you don't want it to be overpowering! Think of how iron rusts when it's outside....It follows the grooves and runs down to the low points. When metal oxidizes, it starts at the top and over time, it runs down in a drip-like fashion, following the contours of the object and eventually pooling slightly near the bottom where water settles. Allow this first coat of iron paint to dry completely.
9. Now go back and paint a second coat of the iron paint on top of the areas where you painted the first layer and while it is still wet, take your bottle of rust activator and give it good spray. It won't show up on the blue paint....only on the iron paint because it reacts with the metal particles in the paint and makes it rust. It takes a bit for the rust to happen so go have a cuppa' joe and then come back and marvel at what kind of sorcery has occured! Now you're going to want to paint everything with this rusty goodness!!! Allow your piece to dry completely....use a hair dryer if you're impatient like me (hello ADHD).
10. The final step......take your Detailer's Choice Applicator Sponge and mist it with water till it's damp but not dripping. Dip it into your matte polyurethane (poured onto a foam paper plate so you don't contaminate the whole container...learned that one the hard way!) and using long strokes wipe the sponge across all the surfaces using care to mop up any puddles left behind with your paint brush. You will love how easy it is to use this sponge applicator because it leaves no brush marks and is about 1000 times faster!! It gets into all the grooves so easily....you will automatically be converted to this method for everything once you've tried it!
Note: DO NOT.... apply the polyurethane over the rusted areas because it will darken the rust effect and be far less interesting!!!!! If there are areas of rust that are just too bright for your liking, then take your artists brush and dab on a bit of polyurethane on it to tone it down.
1. Use wood filler to fill any dings or dents and when dry, sand it smooth. Clean your piece with a 50/50 mix of denatured alcohol and water.
2. Using your 1" Folk Art paint brush, paint 2 coats of Dixie Belle Bunker Hill Blue chalk paint over the entire piece, including the hardware. For the top and sides, I use the 2' brush since it covers more area. Allow it to dry between coats.
3. Take the lighter blue shade of acrylic paint that you have chosen and thin it with water until it is slightly runny, like warm syrup.
4. Dip a round point artist's brush into this paint and start painting around the tops of the detailed areas and the inside edges of the drawer fronts. Keep adding the paint until it begins to run down and pool near the bottom. Don't panic here.....this is the ugly stage you have to push through!
5. If your paint isn't "moving" enough, then take your spray mister and mist away until it begins to drip. You can always go back and add more paint if the effect you're getting isn't strong enough to suit you.
6. Next, lightly mist the top of your piece with water and then take your 2" brush and dip just the tips of the bristles into the thinned paint and, using long side to side strokes, dry brush the lighter blue across the top of the piece and also going down the sides, using long up and down strokes. If your brush begins to drag, then use your water mister lightly to allow your brush to slide easily across the surface. Again, you can add more paint if you want a stronger effect. Just allow the first coat to dry fully so you can see how strong the effect is. Don't forget to highlight your hardware also! Remember, this is art, so don't worry about perfection. A little imperfection is what makes this finish unique and interesting!
7. Once you've reached the level of drips and highlights you prefer, allow everything to dry completely.
8. Now for the magic!!! Thoroughly stir your Modern Masters Metallic Iron Paint. It's very thick so use a stir stick and mix it well. Then using your round artist's brush, start adding the paint onto the areas where you want so see rust. Use a light touch here because you don't want it to be overpowering! Think of how iron rusts when it's outside....It follows the grooves and runs down to the low points. When metal oxidizes, it starts at the top and over time, it runs down in a drip-like fashion, following the contours of the object and eventually pooling slightly near the bottom where water settles. Allow this first coat of iron paint to dry completely.
9. Now go back and paint a second coat of the iron paint on top of the areas where you painted the first layer and while it is still wet, take your bottle of rust activator and give it good spray. It won't show up on the blue paint....only on the iron paint because it reacts with the metal particles in the paint and makes it rust. It takes a bit for the rust to happen so go have a cuppa' joe and then come back and marvel at what kind of sorcery has occured! Now you're going to want to paint everything with this rusty goodness!!! Allow your piece to dry completely....use a hair dryer if you're impatient like me (hello ADHD).
10. The final step......take your Detailer's Choice Applicator Sponge and mist it with water till it's damp but not dripping. Dip it into your matte polyurethane (poured onto a foam paper plate so you don't contaminate the whole container...learned that one the hard way!) and using long strokes wipe the sponge across all the surfaces using care to mop up any puddles left behind with your paint brush. You will love how easy it is to use this sponge applicator because it leaves no brush marks and is about 1000 times faster!! It gets into all the grooves so easily....you will automatically be converted to this method for everything once you've tried it!
Note: DO NOT.... apply the polyurethane over the rusted areas because it will darken the rust effect and be far less interesting!!!!! If there are areas of rust that are just too bright for your liking, then take your artists brush and dab on a bit of polyurethane on it to tone it down.
Now....stand back and admire your art!!! And remember, if you don't like it, there is always sandpaper!!! Lol....hope you enjoyed this tutorial. Now go forth and paint!!!